Tuesday, December 14, 2010

Quick Update

Just wanted to pop in for a quick update. I have successfully completed 6 of the Christmas gifts for my family (sshhh - I made all of the kids a quilt and decided Prince Charming needed one too!) And I am almost finished with 2 more gifts for family members, they just need to be framed. I will do my best to post pics tomorrow.

I thought I would share a couple of really cute ideas from some fellow bloggers. Mine for the Making has this great tutorial up today. You really need to check out her blog!
Reindeer Poop!


What you will need:
-Reindeer Poop poem
-red glitter glue
-cute baggies
-stapler or ribbon 
-candies/treats to represent "poop"


How to make silly Reindeer Poop:
-Copy and paste the poem into a word doc
-Add a cute reindeer clip art
-Print and cut
-Add red glitter glue to the reindeer's nose and let dry
-Fill baggies with candies
-Staple or tie poem to baggy
-Give to guests, friends, neighbors, students, children, family, etc.
-Watch them giggle as they read the poem!


Reindeer Poop
I woke up with such a scare when I heard Santa call...
"Now dash away, dash away, dash away all!
I ran to the lawn and in the snowy white drifts,
those nasty reindeer had left "little gifts".
I got an old shovel and started to scoop
neat little piles of "reindeer poop".
But to throw them away, seemed such a waste,
So I saved them, thinking ~ you might like a taste!
As I finished my task, which took quite awhile,
Old Santa passed by and he quietly smiled.
And I heard him exclaim as he rose in the sky,
"Well, they're not potty trained, but at least they can fly!"


And the Happy Home Fairy did this great post yesterday, that you can read here. I think it is such a cute idea! You "plant" your mints in the evening and by morning they have "magically" grown into candy canes! And she posted a cute little tag to go with it 

There are so many awesome ideas out there! Let's get to crafting!

Tuesday, December 7, 2010

Tag Back Tuesday

Mommying On The Fly
Tag Back Tuesday is another day of the week that you can gain more followers and find other great blogs to follow on a weekly basis. Hosted by Mommying on the Fly

Feeling a little overwhelmed?

I found this little notepad today and had to buy it! It fits me perfectly! I find that I can get so overwhelmed with things that I want/need to do that I end up doing nothing! I can't decide where to start! I'm sure it has nothing to do with my perfectionistic tendencies (sarcastic snickering)- you know, not wanting to start something if I don't have time to finish it the way I picture it in my head...in the time frame I set for myself!

Well, I find myself in that situation today, right now! I have 3 pages of things that I want to get done before Christmas, but I can't seem to decide where to start. It is almost as if I become paralyzed with indecision. Am I the only one that does this? What do you do to overcome it?

So, I am going to attempt to prioritize my list. Or at least I'm going to decide on a starting place and take it from there. First, I Will finish the Christmas gifts that I started for my family....right after I finish cooking dinner!

Monday, December 6, 2010

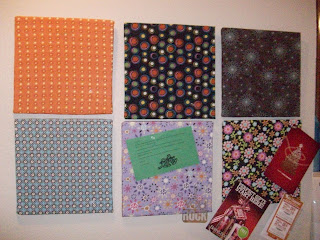
Fabric Covered Bulletin Board

These are super easy and pretty cheap to make, too! The "bulletin board" is actually an acoustic ceiling tile. Home Depot carries them in different sizes - 12"x12" for about $.90 or 2'x2' for $2.06. I bought the 2'x2' and cut it into fourths so I had four 12" squares (about $.51 per square!). It is really easy to cut, just use a box cutter or saw. I also made a few that I only cut in half - 1'x2'. 
This is also a perfect project to use your fat quarters with!

So here's what you need to get started:
Acoustic ceiling tile
Fabric
Wire
Staple gun or hot glue
Wire cutters
Scissors
Start by laying your fabric out and setting your tile on top. Cut away the excess fabric, only leaving enough that will fold over to the back of the tile.
Once you have your fabric cut, get out your wire and cut about a 9" piece. Bend it to make a "U" shape.
From the front of the tile push the wire through (really easy to do) and twist in the back to make a hanger.
 This is what the front of the tile will look like.
Now, take your tile and place it right side down on top of the fabric which is also right side down. Pull the edge of one side of the fabric up and to the back, now staple. Continue until all sides are done.

And that, my friends, it that! 

These are wonderful for all kinds of different things. I decided we each needed our own bulletin board in order to keep up with what's going on with everyone. It's a great place to keep those important school papers, coupons you don't want to forget, or for leaving each other little tokens. I do intend to put our first initial on each of the bulletin boards so there will be no question of which board belongs to which family member... but I haven't gotten there yet!

Thanks for reading!

Sunday, December 5, 2010

Christmas Tree Paper Garland

I thought I would share this cute, easy garland with you today. I have been seeing these precious buntings and garlands all over blogland and had to jump on the wagon. Hope you enjoy!
Supplies needed:
Christmasy scrapbook paper/cardstock
3-D dots
Scissors
Pencil
Jute/Ribbon
Scrap fabric for bows
Ruler
Hole punch
Begin by making a template for your triangles. Fold a piece of cardstock in half and using your ruler mark a line from the fold to the bottom edge of your cardstock.
Cut the triangle out with your scissors. Now cut out two more triangles that are smaller/larger than this one.


I cut out three different sizes so the trees would have more dimension/color. Cut a separate template out for each triangle. 
Now, take your Christmasy paper and flip it over to trace your triangles.
Cut them all out and get ready to assemble.
Decide the order you want to stack your triangles. Place a 3-D dot on the bottom triangle and place the middle triangle on top. Repeat with the top triangle. Now you have three stacked triangles.
Next you want to punch a hole in the top of the "tree" so you can run your jute/ribbon through.
Decide how long you want your garland. I cut mine 6 1/2' long. Tie a knot at one end of the jute.
Thread your tree onto the jute.
Tie the jute so that the "tree" will stay in place.
Take a piece of your scrap fabric and make a little tie on the jute. Slide it over to cover the knot.
Continue about every 6" with the "trees" and ties and you should end up with this...
These can be embellished in so many different ways...glitter, ribbon, whatever your little heart so desires.
Have a blessed Sunday!

Friday, December 3, 2010

Boost My Blog Friday

Yet another fabulous friend finder. Design it Chic is hosting: 
BoostMyBlogFriday
It's simple.. the only rule is: no rules!! That's right!!
SO just make sure you link with us, follow us as the hostess (and leave us a comment so we know you follow us and return the love back:) and then feel free to follow whoever you want to, leave nice comments, send them love notes and chocolate boxes *WOW scratch that last part:P* and don't forget to do the happy dance!

Friend Finding Friday

Another awesome friend finder hosted by Supermom
Friend Finding Fridays
Welcome to Supermom’s addition of Follow Fridays, called “Friend Finding Fridays”!!! Each Friday (actually Thursday night 9 PST) we will be meeting up to add our blogs to the list in hopes of finding new friends to fall in love with and follow along with share our blogs with others. This is a great way to make new friends and get new people to follow your blog.
The rules (because there always has to be rules):
1.   Follow me (#1 on the list) and I’ll follow you back ;)
2. Follow the #2 post; my Super-Blogger of the week 
3.  Link back to FFF through either a button or hyperlink to spread the word.
This can be done however you like. You can make an individual post for it or you can just add the link at the bottom of your normal post for the day. 
4. Add your main URL to the list below and either your name or the name of your blog or both if they fit :)
5. When finding new friends make sure to let them know you found them here at Supermom’s Friend Finding Fridays
6. The most important rule: HAVE FUN Thumbnails: This is a Blog Hop! 36 entries so far... you're next!

Fun Follow Friday


What a great idea and opportunity. Simply Stacie and My Wee View are hosting this Fun Follow Friday.
The goal of this hop is to get new Google Friend Connect Followers for your blog and be introduced to new blogs to follow! We wanted to keep it fun and easy so all you have to do is add your blog link and start blog hopping and following away! You aren’t required to write a post for your blog for Fun Follow Friday unless you want to (but we really appreciate it if you do to help get the word out).
When you visit a blog that you like and want to follow, leave them a comment with your link telling them you are following from the Fun Follow Friday. Of course, we would love for you to follow both hostesses blogs, Simply Stacie and My Wee View, but it isn’t mandatory. If you do follow us, just leave us a comment and we will follow you back.
The main goal is to have fun and follow the blogs that interest you!
There are a few fun things that Fun Follow Fridays does each week:
1.  Each week 1 winner will be randomly drawn for the #3 Spot, this week it’s Opening Lines.
Happy hopping along!
Crafty Kayla Rocks!!!

If you have not been to this site, you really need to. Crafty Kayla
She designed my button and grab box on the side! I am uber excited.
She is doing a special offer for new followers--- a Free blog button!!!!
Check out the link here

She also has some amazing recipes that I can't wait to try! And really cute projects!

Thank you so so so much Kayla!

Wednesday, December 1, 2010

Christmas 2010 - A Change of Focus

Over the last couple of weeks I have really been thinking about Christmas and how our family celebrates. For most of my childhood and early adult years I knew that Christmas was a celebration of the wonderful gift God gave to us in Jesus, but what it really stood for was presents - how much are we going to spend on each person, and what did I want! I do not want that to be the focus of our Christmas celebration this year. So....some changes are being made!

Until this year, I had heard the term Advent but was not sure exactly what it meant. I grew up in church but this was not something we practiced/observed officially. I have been doing a little research :) and in my words, Advent is a celebration of the birth of Jesus that begins on December 1 and lasts through Christmas. I know that Advent is celebrated in different ways by different people with wreaths/calendars/etc and within different time frames. For our family, we are going to begin the celebration today and read a verse from the Bible each day through Christmas Eve. I found these wonderful Daily Bible Verse Advent Cards over at Happy Home Fairy


I would like each day to also include something fun for the family to do together...an act of service for others, make a garland, bake cookies to give away. Any other good ideas?

Another change we are making is in the gift giving department. This year I want the gifts that I give to mean something to the recipient. I want them to know that I really put some thought into their gift. Over on Honey Bee Buzz, Melissa was talking about gifts for Christmas. Some of the ideas included....

1. Give each child four gifts - something they want, need, wear, and read.
2. Give each child three gifts to symbolize the three gifts the wise men gave to Jesus
           one for Gold - garment/clothing
           one for Frankincense - fun
           one for Myrrh - mind
3. Each child gets three presents - one from mom, one from dad, and one from Santa

We are leaning toward the four gifts, but I really like the symbolization of the Gold, Frankincense, and Myrrh. I am also attempting to make many of the gifts we are giving this year, which should get an interesting response!


Overall, I just want my kids to understand what the season is really about. Yes, I think it should be fun because it is a celebration! But I want their focus to be on thankfulness, for the wonderful Gift and gifts that God has provided for them.

Thursday, November 25, 2010

Happy Thanksgiving


Just a quick note to wish everyone a Happy Thanksgiving! Bring on the dressing!

Tuesday, November 23, 2010

Easy Upcycled Christmas Ornaments

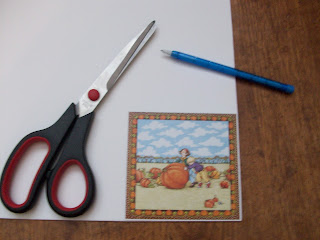
I have had these Mary Engelbreit calendars for quite a while now because I couldn't bear to throw away the darling artwork inside. I just knew I could figure out something to do with them. I ran across them the other day and decided to make some ornaments out of the Christmas artwork.
Supplies you will need:
     Selected artwork (from calendars, greeting cards, printed images from internet)
     Foam sheet
     Pencil
     Scissors
     Hole punch
     Mounting squares (or other adhesive you would like to use)
  
First, decide on the artwork you want to use. Trace it on the foam board with your pencil. Cut out with your scissors. This was my first time to work with foam sheet, gasp, and I love it. It is sooo easy to cut.


Next, take your mounting squares and place one in each corner of the foam sheet you just cut out. Place your artwork on top and press down to secure. Place a hole in the top center of your ornament with your hole punch. Tie ribbon to make a loop to hang. And then you're done!

A great way to show off the beautiful artwork from calendars and greeting cards!


Sunday, October 31, 2010

Welcome to the Barnyard!

Thank you for stopping by our Barnyard! My name is Laurie and I am married to my prince charming, Mike. I have been blessed with two wonderful children - Cody-16, and Kenedy-11. My blessings continued when I remarried and gained two more wonderful boys, Josh-18, and Matt-16. I love creating new things and trying to add a little whimsy to our life. Stay tuned for our antics from the Barnyard!