Check out this easy Burlap Candlestick Topiary
This was inspired by House of Smith's Napkin Snowball Craft, tutorial found here.
Supplies needed:
Candlestick
Christmas ornament or styrofoam ball
Silicone
Burlap circles - about 1.5-2" diameter (doesn't have to be perfect circles)
Low temp glue gun
Pencil with eraser
Take the silicone and squeeze it around the inside rim of the candlestick. Insert the ornament with the "neck" going down into the candle stick. Allow to dry at least 3 hours.
Take a burlap circle and wrap it around the pencil eraser, place a small dot of hot glue on burlap and apply to ornament. Continue until covered. Easy as pie, umm...pie!
Since I already had the silicone out and some extra candlesticks, I decided to play around and glue a few pieces together. Take a look...
Now for that pie...
Showing posts with label Tutorials. Show all posts
Showing posts with label Tutorials. Show all posts
Saturday, January 8, 2011
Monday, December 6, 2010
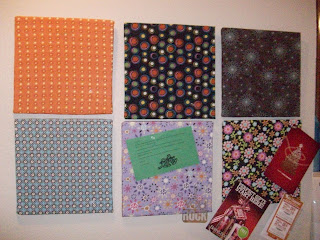
Fabric Covered Bulletin Board
These are super easy and pretty cheap to make, too! The "bulletin board" is actually an acoustic ceiling tile. Home Depot carries them in different sizes - 12"x12" for about $.90 or 2'x2' for $2.06. I bought the 2'x2' and cut it into fourths so I had four 12" squares (about $.51 per square!). It is really easy to cut, just use a box cutter or saw. I also made a few that I only cut in half - 1'x2'.
This is also a perfect project to use your fat quarters with!So here's what you need to get started:
Acoustic ceiling tile
Fabric
Wire
Staple gun or hot glue
Wire cutters
ScissorsStart by laying your fabric out and setting your tile on top. Cut away the excess fabric, only leaving enough that will fold over to the back of the tile.
Once you have your fabric cut, get out your wire and cut about a 9" piece. Bend it to make a "U" shape.From the front of the tile push the wire through (really easy to do) and twist in the back to make a hanger.
This is what the front of the tile will look like.
Now, take your tile and place it right side down on top of the fabric which is also right side down. Pull the edge of one side of the fabric up and to the back, now staple. Continue until all sides are done.
And that, my friends, it that!
These are wonderful for all kinds of different things. I decided we each needed our own bulletin board in order to keep up with what's going on with everyone. It's a great place to keep those important school papers, coupons you don't want to forget, or for leaving each other little tokens. I do intend to put our first initial on each of the bulletin boards so there will be no question of which board belongs to which family member... but I haven't gotten there yet!
Thanks for reading!
Sunday, December 5, 2010
Christmas Tree Paper Garland
I thought I would share this cute, easy garland with you today. I have been seeing these precious buntings and garlands all over blogland and had to jump on the wagon. Hope you enjoy!
Supplies needed:
Christmasy scrapbook paper/cardstock
3-D dots
Scissors
Pencil
Jute/Ribbon
Scrap fabric for bows
Ruler
Hole punch Begin by making a template for your triangles. Fold a piece of cardstock in half and using your ruler mark a line from the fold to the bottom edge of your cardstock.
Cut the triangle out with your scissors. Now cut out two more triangles that are smaller/larger than this one.
I cut out three different sizes so the trees would have more dimension/color. Cut a separate template out for each triangle.
Now, take your Christmasy paper and flip it over to trace your triangles.Cut them all out and get ready to assemble.
Decide the order you want to stack your triangles. Place a 3-D dot on the bottom triangle and place the middle triangle on top. Repeat with the top triangle. Now you have three stacked triangles.
Next you want to punch a hole in the top of the "tree" so you can run your jute/ribbon through.
Decide how long you want your garland. I cut mine 6 1/2' long. Tie a knot at one end of the jute.
Thread your tree onto the jute.Tie the jute so that the "tree" will stay in place.
Take a piece of your scrap fabric and make a little tie on the jute. Slide it over to cover the knot.
Continue about every 6" with the "trees" and ties and you should end up with this...
These can be embellished in so many different ways...glitter, ribbon, whatever your little heart so desires.
Have a blessed Sunday!
Tuesday, November 23, 2010
Easy Upcycled Christmas Ornaments
I have had these Mary Engelbreit calendars for quite a while now because I couldn't bear to throw away the darling artwork inside. I just knew I could figure out something to do with them. I ran across them the other day and decided to make some ornaments out of the Christmas artwork.
Mounting squares (or other adhesive you would like to use)
Supplies you will need:
Selected artwork (from calendars, greeting cards, printed images from internet)
Foam sheet
Pencil
Scissors
Hole punchMounting squares (or other adhesive you would like to use)
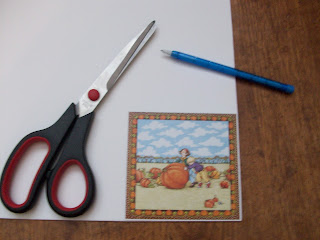
First, decide on the artwork you want to use. Trace it on the foam board with your pencil. Cut out with your scissors. This was my first time to work with foam sheet, gasp, and I love it. It is sooo easy to cut.
Next, take your mounting squares and place one in each corner of the foam sheet you just cut out. Place your artwork on top and press down to secure. Place a hole in the top center of your ornament with your hole punch. Tie ribbon to make a loop to hang. And then you're done!
A great way to show off the beautiful artwork from calendars and greeting cards!
Subscribe to:
Posts (Atom)


